Running Python files with ROS2 from Command Line
What you'll learn on this page:
-
How to create a workspace, package
-
How to edit and why we edit .xml and setup.py files
-
Why we use executables and what they are
-
How to run a python file in terminal
Note:
-
To run python files without creating workspaces and packages (bypass this tutorial), click here.
Conceptual graphic:
Workspace
SRC
<pkg name>
<pkg name>
setup.py
package.xml
setup.cfg
__init__.py
my_node.py
action_file.py
Note: when something is written with brackets [ ] on this page, that means you should fill it out with your specific workspace/file/etc name. Do not include the brackets in your code. For example, if your workspace name is dev_ws, then you would replace {workspace name} with dev_ws.
1. Create a workspace
Note: click here for full instructions on the ROS2 website, or read below for simplified instructions.
A workspace is a directory containing ROS 2 packages. It's a "glorified directory."
a. First you must source the environment. Then you must make a directory.
This command sources the ROS2 environment.
This command creates a new directory. Replace {workspace name} with a name such as dev_ws. (ex: mkdir -p ~/dev_ws/src)
This allows you to enter the {workspace name}/src workspace.
Now you are back in the root of the workspace.
b. Now you must build the workspace, then source the workspace.
Build your packages.
Source the workspace.
2. Create a package
Note: click here for full instructions on the ROS2 website, or read below for simplified instructions.
A package is like a folder or container for your ROS 2 code. In order to install python code for yourself or share it for others to build and use, it must be in a package.
a. First, we create the package.
Go to the src folder to create a package.
Create a package with any name (replace [package name])
b. Next, we build the package.
Go to root of workspace.
This command builds all the packages in your workspace. If you only have one or two packages, this command is good.
This command builds one specific package in your workspace. Use this command if you have many packages in one workspace.
Source the workspace.
3. Edit package.xml and setup.py files
Note: click here for full instructions on the ROS2 website (step 6), or read below for simplified instructions.
a. You must manually go into your files, click "Home," then the folder with your <workspace name>, then src folder, then the folder with your <package name>.
For reference in the screen shots below, my [workspace name] is dev_ws and my [package name] is my_package.


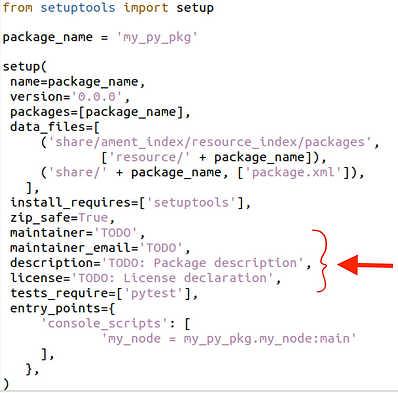
Open each file using "Text Editor." Change each line that includes "To do." This includes author/author email, license, and description. Make sure the package.xml and setup.py files match for these three additions.
How package.xml shows up before edits:

package.xml filled out example:

How setup.py shows up without edits:

setup.py filled out example:

b. You must add entry points so ROS2 knows which robot it should be talking to. We only add entry points to the setup.py file. The structure is
[executable name]=[package name].[python file name]:main',
You can choose any name for your executable, but make sure the package name is the same as before, and make sure the python file name is the .py file that you want to run. It is worth noting that you should have your python file in the package.
I want to run the python file action_undock.py so I made sure it is in my package folder within my package folder of the same name. For example, my package is called my_package, so my .py file is within the my_package folder in another my_package folder. The image to the right is the my_package folder (arrow indicates which folder we're in), and the second my_package folder is circled. Double-click that. Click here to access the examples such as this one.

This is the folder where all your python files go. Right click your file (in this case action_undock.py) and open with text editor. Notice how the red arrow points to the current folder which is my_package within the my_package folder.

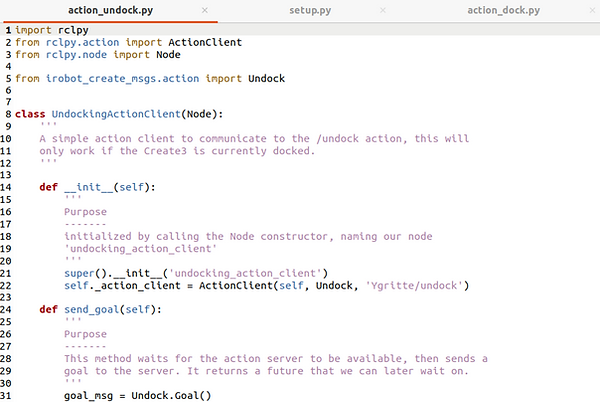
This is what my action_undock.py file looks like. In any python action file, go to the self._action_client line and add your namespace and then a "/" before the action. For reference, your line probably looks like self._action_client = ActionClient(self, Undock, 'undock').

It is possible that this step is not necessary. For the files in this repo, the namespace was made a global variable. In that case, you will just change the variable to your namespace and it will auto-populate wherever it is needed in the script.
The executable name I chose was "undock." As you can see, I have my [package name] which is my_package and the python file name which is action_undock (omit the .py). Then, :main. Once you start adding more executables, add a comma after the apostrophe on the main, and add another executable line with the same format.

4. Repeat step 2b to build and install.
Go to root of workspace.
Not recommended: This command builds all the packages in your workspace. If you only have one or two packages, this command is good.
Recommended: This command builds one specific package in your workspace. Use this command if you have many packages in one workspace.
Install the workspace.
5. Run!
Note: Whenever you add a new file to your package (along with another executable name), you must repeat step4 (build and install).