top of page
Setup a Virtual Machine on your Mac
1. Sign up for a personal use VMWare License and Download and Install VMWare here.

2. a) Manually download VMWare Fusion

2. b) If it asks you for a License Key, you can find it under License Information on the website

3. Download Ubuntu 22.04 Desktop Image here and create a new virtual machine.
Although it is not 20 GB big, you need 20 GB of free space in your laptop for the download.
The picture to the right shows Ubuntu 20.04. You'll be downloading 22.04. The page should look similar tho

4. Install Ubuntu on new virtual machine in VMWare. Find specific instructions here.

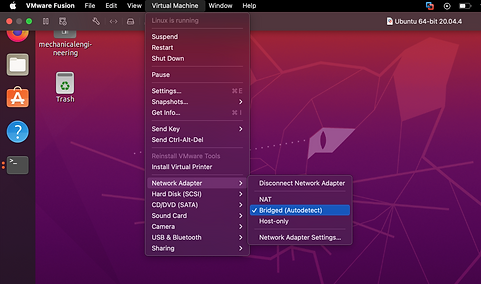
5. Change Network Adapter in VMWare:
Go to the Virtual Machine tab at the top and scroll down to Network Adapter and select "Bridged (Autodetect)."
6. It may ask you to update security and privacy settings.
-
Go to system preferences and click security and privacy.
-
Look at the bottom left and click the lock to make changes.
-
Select “VMware Fusion” under the accessibility on the left.

7. Log in to your virtual machine.

8. Once you are logged into the virtual machine, look to the bottom left with 9 icons and click it.

9. Next, open “terminal.”

10. It should look like this (with your user before the @). Now we can install ROS2 on Ubuntu.
Note: Try to copy and paste this doc by using cmd+c in this doc, and pasting in the virtual machine by using ctrl+shift+v.
If pasting does not work between your mac machine and the virtual machine. You can try this command:

12. Navigate to this page and follow the instructions to install ROS 2.
13. Install Create® 3 example repository by following instructions here.
14. Try the command ros2 topic list in terminal. If your machine and Create® 3 are on the same Wifi, you will get the result seen on the right.

bottom of page